domenica 27 luglio 2025

A step back (in time): Medieval Basic Impetus 2.0 in 15 mm

 We're Back to the Middle Ages (in 15mm)!

After a long period dedicated to the chaos of the battlefields of the Thirty Years' War and 28mm scale, we marched our miniatures back to the medieval battlefield—this time, in 15mm.

In our latest session, we dusted off Basic Impetus 2.0: Luca’s Aretine Communals faced off against a Catalan-Aragonese host. The latter was assembled by combining my own army with some timely reinforcements from Giacomo’s ongoing Scaligeri's project.

We’ll admit it up front—some of the bases weren’t fully finished (mea culpa!), but the game spirit was very much alive.

Without diving into too many gameplay details, we found Basic Impetus 2.0 easy to pick back up after the break. In just a few hours, we were deep into a balanced and exciting battle that delivered a clear—but far from predictable—result. The Aretines ultimately had to retreat after suffering heavy losses, their fate sealed by a decisive Almughavar charge that shattered the mercenary heavy cavalry.

And now? Well, the fever has spread. Everyone at the club is already scouring 15mm manufacturer catalogues, dreaming up ways to finish off their current armies... or field entirely new ones.

More to come soon—stay tuned!


The Catalan Feudal Cavalry

Spanish Jinetes vs Mounted Crossbowmen

Mercenary Heavy Cavalry fighting for the Aretine

The clash of the infantries in the centre


domenica 13 luglio 2025

A Wargamer in Corfù

Corfù, the largest of the Ionian Islands, is steeped in history and offers a perfect opportunity to combine a family summer holiday with various wargaming inspirations.


Historical background

The island was once part of the Eastern Roman Empire (later known as the Byzantine Empire). During late antiquity, Corfù was raided by Vandals and Goths, while during the early medieval period, it was invaded by the Normans in 1084 during their failed attempt to conquer the Balkans. Following the Fourth Crusade, Corfu was assigned to Venice, which contested its control with the Despotate of Epirus and the Angevins. From 1386 onward, the Serenissima (Republic of Venice) maintained firm control of Corfu until its fall in 1797.

Separated from the Greek and Albanian mainland by a narrow strait only 3 to 25 kilometres wide, Corfu was a vital route for the Venetians to access their holdings in the Eastern Mediterranean. As the Venetian colonial empire declined, Corfu remained the gateway to the Adriatic Sea and served as the last major bulwark against Ottoman expansion, especially after the loss of the Morea in 1715.

In 1716, the island was the site of a memorable Ottoman siege. Thanks to the determination of the defenders, led by Count Matthias von der Schulenburg, and the concurrent Austrian victory at the Battle of Petrovaradin, this siege marked the last significant Venetian victory during the troubled final century of the Republic. We will explore this siege further in a future blog post.

Later, Corfu played a role in both World Wars: during World War I, it served as a refuge for the Serbian army, and in World War II, it became a base for Italian operations against Greece. After Italy’s capitulation on 8 September 1943, Italian troops stationed in Corfu and Cephalonia were attacked and massacred by their former German allies.


What to see

And now, on to the travel suggestions! Please note that I’ll be focusing exclusively on military-related sites—but keep in mind that Corfu offers a wealth of historical, artistic, and natural wonders beyond these.

The ruins of the early Christian basilica at Palaiopolis mark the location of the island’s original settlement, which was abandoned due to barbarian invasions and the instability of the 5th and 6th centuries AD. Some of the basilica’s frescoes and mosaics are preserved in the museum at the Old Fortress in Corfu Town. Alas, none of the military subject!

From the Byzantine period, visitors can explore the ruins of Angelokastro (Castle of the Angel), dramatically perched atop a hill overlooking the stunning beaches of Paleokastritsa (whose name, incidentally, means "Old Castle"). Located in the northern part of the western coast, the fortress was likely built under the Despotate of Epirus as a defence against Western powers such as the Venetians and Angevins. On the southeastern coast, the small castle of Gardiki dates to the same era. As of my visit in 2025, only the perimeter walls and a single gate remain, but they still give a clear impression of the site's original scale. See pictures below.


Moving to the Venetian period, in the North-East extremity, we have the fortress of Kassiopi: a former Byzantine fortress, later one of the main Venetian strongholds, allowing the control of the narrower tract of the strait. Below, the night view.


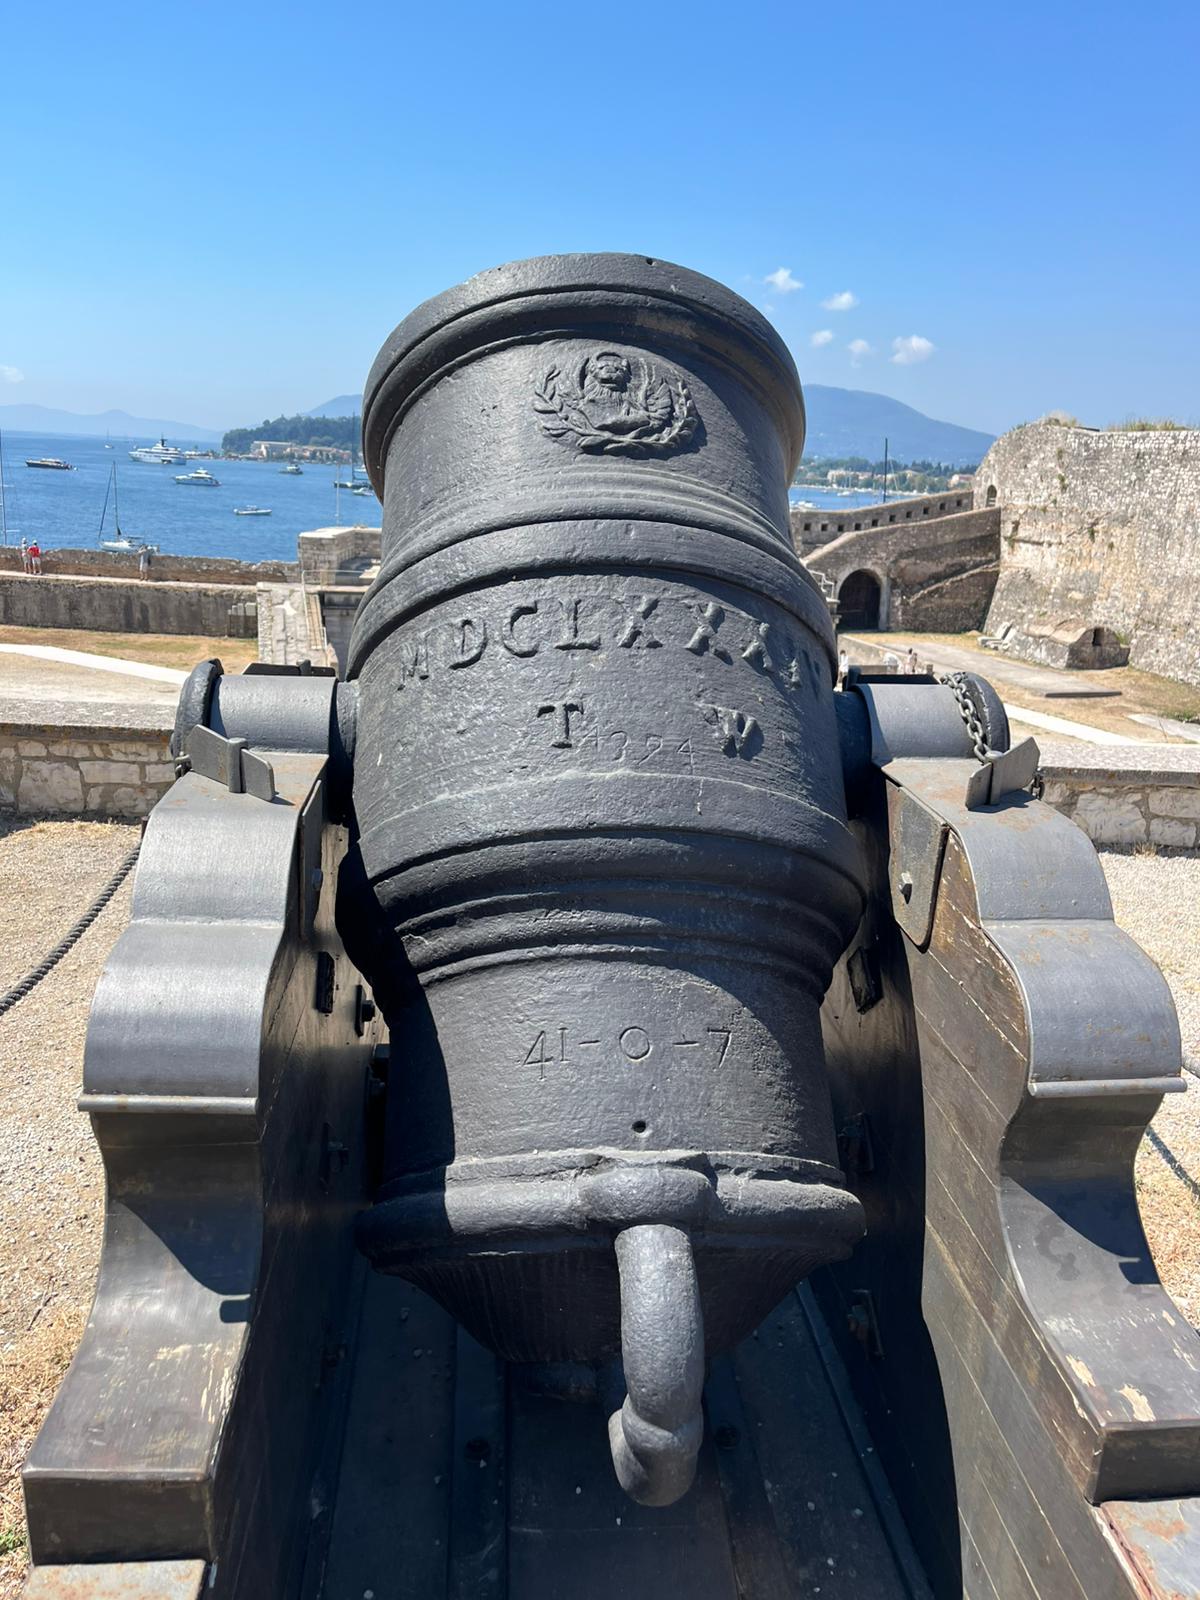
Moving to the capital city of Corfù, the Venetians built two fortresses: the Old Fortress (on the site of a previous Byzantine castle), is the main attraction of the city, and provides a perfect example of Venetian fortress in their colonial Empire, serving as a model for fortresses in other Greek islands and mainland. The bastions and the ramparts are perfectly preserved. Inside, there are some artillery guns from the late 17th - early 18th century and remarkable Venetian St. Mark lions. The new Fortress was built later, but still before the 1716 siege. Here are some pictures from the Old Fortress.


Next to the main gate of the fortress, you can also find the statue of von Schulemberg, the Saxon general who defended the island during the 1716 siege and represented the last victorious general in the history of Venice. Again, he deserves one his own post in the future.


According to the military precepts of the Age of Reason, Venice demolished the buildings in front of the Old Fortress to deny cover to any approaching enemy. Like many other features on the island, it still retains its Italian name Spianada (flattened space), similar to Verona's Spianà. This is the main square of Corfù. Funnily, exactly as in Verona, the marble pavement in front of it is called a liston.

I have to thank the page Il Viaggio di Scoperta, which in its last video shows more Venetian artefacts from Corfù... in the Tower of London! They were brought there after the Island became a British protectorate. For the curious, the video (in Italian) is here. I recommend the page to anyone passionate of Venice,

Lastly, in Gouvia, about 8 km north of the city, you can visit the remains of the Venetian arsenal. While it still deserves a visit, its conservation status is not great, and it is a shame because had a pivotal role in the naval power of Venice in the entire region, in particular again during the siege of the island: more naval wargamin opportunities!


For the moment, it is all, but as you can infer, there are many ideas which will be covered in future posts. So stay tuned!


sabato 14 giugno 2025

Report – Evento “Gioca La Storia” | 8 Giugno 2025

 🇮🇹 (English Below)

L’8 giugno abbiamo partecipato con grande entusiasmo all’evento Gioca la Storia, tenutosi presso il Museo delle Forze Armate 1914-1945 di Montecchio Maggiore. In questa splendida cornice, ricca di reperti storici di grande valore (che meriteranno un post a parte), diverse associazioni e gruppi di wargame storico tridimensionale provenienti da tutto il Veneto hanno allestito tavoli dimostrativi per far conoscere al pubblico il mondo del wargame e il suo valore educativo nella simulazione e nello studio della storia militare. 

Durante la giornata si è giocato con regolamenti ambientati nella Prima e Seconda Guerra Mondiale, tra cui: Bolt Action (scala 28 mm), Schutzengruppe (scala 1/72), Flames of War (scala 15 mm), Lacquered Coffins (scala 1/300, aviazione WWII) e Blue Max (WWI, gioco aereo).

La partecipazione del pubblico è stata ottima, con particolare entusiasmo da parte dei più piccoli, attratti in modo speciale dal tavolo di Bolt Action.


28 mm Bolt Action, First Don offensive game


Tobruk 1942 with Bolt Action (28 mm)

Italian and British fight over the Mediterranean sea

Sono state allestite anche vetrinette didattiche per illustrare “gli attrezzi del mestiere” dei wargamer!

Some pictures from the exhibition

Non vediamo l’ora di poter replicare questa bellissima esperienza con una seconda edizione! Vogliamo in particolare ringraziare il direttore del museo Stefano e tutti i volontari del museo per la bellissima opportunità, Enrico e Lorenzo, degli "Amici del Modellismo Treviso", "Il Circolo di Pietra" e gli amici di Bassano del Grappa (Maurizio in primis).


Avanti Savoia! 28mm Italian cavalry in the Steppe (Bolt Action)

Biplanes fight! 1/300 H&R planes game with Lacquered Coffins

Tobruk 1942 


SM79 lands a torpedo which blows the British cruiser


EN

On June 8th, we enthusiastically took part in the Wargame at the Museum event, hosted at the Museo delle Forze Armate 1914-1945 in Montecchio Maggiore. In this beautiful and historically rich setting, various wargaming clubs and associations from across the Veneto region presented tabletop simulations to showcase the educational and historical value of miniature wargaming.

Several gaming tables focused on World War I and II scenarios, featuring: Bolt Action (28 mm scale), Schutzengruppe (1/72 scale), Flames of War (15 mm scale), Lacquered Coffins (1/300 scale, WWII air combat), and Blue Max (WWI aerial dogfights).

Educational displays highlighted the tools and materials used by wargamers, and the museum staff ensured excellent organization – we thank them warmly for their support and hospitality.

The event was well attended, with many children especially captivated by the Bolt Action table.

We are already looking forward to the second edition of this fantastic event!


giovedì 13 marzo 2025

Lion Rampant at Lazise Gioca: A Medieval Skirmish on Lake Garda

This past weekend, we had the pleasure of attending Lazise Gioca, a fantastic gaming convention held in the scenic town of Lazise, on the banks of Lake Garda (Verona, Italy). Among the many tabletop and board game offerings, we set up a historical wargaming table featuring Lion Rampant by Osprey, a fast-paced and engaging skirmish game perfect for conventions.

Since the lake Garda was a border region between Milan and Venice, we decided to bring two condotte  from the late 15th century: one representing Milan and the other Venice. Each force was built to the standard 24-point size, constructed mainly from Perry's plastic miniatures. Throughout the day, we managed to run two different scenarios.

The Battles

Our first scenario was Bloodbath, a straightforward clash where both sides sought to eliminate the other through sheer force of arms. It was a brutal and fast-paced engagement, with both condotte trading blows in a display of tactical maneuvering and daring charges. Despite the famed resilience of Venetian forces, the Milanese emerged victorious, securing a hard-fought win.

Next, we set up The Fugitive, a scenario centered around capturing (or rescue) a key figure hiding on the battlefield. The Milanese, emboldened by their earlier success, pressed the attack relentlessly and managing to free the prisoner. Once again, Milan’s condotta claimed victory!

A Great Experience

The event was a fantastic opportunity to showcase Lion Rampant and introduce new players to the world of historical wargaming. The game’s elegant mechanics and accessible rules made it a hit among both casual visitors and experienced gamers alike.

Overall, Lazise Gioca proved to be a fantastic convention, in an amazing setting, and we thoroughly enjoyed bringing late medieval Italy’s mercenary battles to life. 

Milanese foot men at arms fight Venetian stradiotti

The setting

The Venetian Cernide (foot yeomen in the ruleset) enter the village

The Heavy Cavalry clashes!

Milanese Crossbowmen: one of the major contributors to Milanese's victory

Stradiotti tries to held the line against the heavier Milanese's Lance Spezzate

Venetian Schioppetti are mauled by Milanese dismounted knights


lunedì 10 marzo 2025

The Battle of Messeburg, 1632


The Thirty Years' War has been ravaging Germany for years. Over the past winter, Swedish King Gustavus Adolphus skillfully employed diplomacy to strengthen the Protestant coalition, securing new allies against the Catholic Imperial forces. In particular, the Dutch Republic officially joined the war, bringing much-needed financial support and reinforcements to the campaigning Swedish army. 

At the beginning of spring, the Protestant army marched south, prepared to confront the Imperial forces. The Imperials, determined to halt their advance, moved to intercept. Their armies would soon meet near the bustling market town of Messeburg, where a decisive battle loomed.


Initial Deployment

The Swedish army took position between the river and the village of Messeburg, anchoring its right flank with Protestant allied regiments of Dutch and Scottish troops under General De Vere, supported by dragoons commanded by Justinus von Nassau. The Swedish left flank was held by the cavalry, while in the center, a small reserve under Åke Tott stood behind the main infantry line.

The Imperial forces deployed strongly on their left flank, concentrating veteran tercios and their best marksmen in this sector. Their right flank, composed of heavy cuirassiers, was positioned beyond the river, seemingly preparing for an outflanking maneuver.


Early Skirmishes on the Left Flank

To counter the Imperial commanded shot in the wooded area on the Swedish left, the Dutch commander sent his mounted arquebusiers into the forest. However, their horses struggled with the rough terrain, and the Imperial troops managed to penetrate the woods, forcing the Dutch skirmishers to fight defensively with little success.


Stalemate in the Center and Right Flank

For much of the morning, the rest of the battlefield remained quiet. The Imperial troops stayed out of range of the Swedish artillery, while the Imperial cuirassiers on the right bank of the river showed no immediate intention of crossing. The Swedish cavalry took position on the opposite bank of the river, ready to strike if the enemy attempted to ford the waters.


Fierce Fighting for Messeburg

At the center of the battlefield, a brutal contest erupted for control of Messeburg village. Dragoons and commanded shot on both sides engaged in bloody street fighting, with the village changing hands multiple times. Only by the end of the day did the Swedish forces secure firm control over the settlement.

Åke Tott’s Failed Charge

Noticing a gap between the Imperial center and left flank, General Åke Tott led a squadron of demicuirassiers in a daring charge against the Imperial artillery. Despite initial success, the assault was repelled, and the Swedish cavalry was chased down by a squadron of Imperial dragoons hastily redirected from the fight in the village, momentarily relieving pressure on the besieged Protestant regiments.


Crisis on the Swedish Right

Meanwhile, on the Swedish right flank, the Dutch and Scottish mercenary battalions came under severe artillery fire, soon followed by volleys from the advancing Imperial tercios. Exposed in the open, the Protestant regiments suffered terrible casualties and began losing cohesion.


Gustavus Adolphus Takes Action

Realizing the precarious state of his right flank, King Gustavus Adolphus decided to order an advance of his Swedish infantry to stabilize the situation. The disciplined Swedish musketeers slowly moved into firing range, preparing to pressure on the Imperial right flank.


Imperial Assault on the Dutch and Scottish Regiments

Sensing the weariness of the Swedish right flank, the Imperial forces launched a full-scale assault on the battered Dutch and Scottish regiments. Despite their determination, the Protestant mercenaries suffered horrendous losses but held their ground at great cost, momentarily halting the advance, but on the brink of collapse.


Swedish Cavalry’s Bold River Crossing

In a desperate attempt to turn the tide, Gustavus Adolphus ordered his elite Swedish cavalry to ford the river and strike the Imperial right flank. The Imperial cuirassiers were caught off guard, and one squadron was routed at significant cost. However, the fighting along the river remained inconclusive, and the Swedish forces could not fully exploit their success due to the disarrangement they come after the perilious crossing.


Collapse of the Swedish Right Flank

Under relentless pressure, the Swedish right flank finally began to crumble, with two regiments breaking and fleeing. The Imperial forces pushed forward, threatening to roll up the entire Swedish line.


Tott’s Decisive Rear Attack

Meanwhile, Åke Tott regrouped his cavalry in the Imperial rear, having defeated the Imperial dragoons. He then launched a decisive charge into the rear of a struggling Imperial tercio, which was already wavering under fire from the elite Swedish Yellow Regiment.


Battlefield Stalemate

As the sun set, the battlefield was in a state of deadlock. The Swedish right flank was shattered, incapable of further combat. However, a significant gap had been opened in the Imperial center, with Messeburg in Swedish hands, effectively splitting the Imperial army in two. On the left flank, the battle between the opposing cavalry forces remained inconclusive, although reserves were still available to the Catholics. Although numerically disadvantaged and suffering heavier losses, the Swedish forces and their Protestant allies maintained control of the field and withdrew in good order, denying the Imperials a clear victory. The battle ended in a costly stalemate, with both sides bloodied and exhausted.


Final Comment

We played this game at Model Expo 2025 Convention in Verona with Liber Militum Tercios, 2000 points per side, 2 vs 2 players, in a 240 x 180 cm table! The game played smoothly over 5 hours. The Imperial ended with 2 points of advantage, which were not enough to declare a clear victory. Overall, we enjoyed the experience and many people stopped to ask and take pictures!